Posts

Filet Crochet Name Doily Border

Image
Here is the (long-awaited) follow up post for the filet crochet name doily.  I've also posted a video tutorial on my YouTube Channel! Crochet Name Doily Part 4 This pattern originally comes from CrochetDoilies.com with a few modifications.  This is a border that I use on almost ALL of my name doilies in some way or another.   Here is the picture from the original pattern. (Unfortunately, the enlarged photo link on the original page no longer works.) Here is a screenshot of the original pattern (in case the original become unavailable at some point). Credit & Copyright: CrochetDoilies.com Don't forget to Subscribe to  My Channel on YouTube!

Free Multi-Hearts SVG

Image
With all the rainbow & hearts challenges out there right now, I thought it would be nice to have a FREE multi-heart SVG available to help us out.  The kiddos can still help stick them to the windows, but by using these two SVG files you can cut a bunch of hearts out in each color in minimal time using your cutting machine.   These are created to fit on a 12x12 piece of paper so you can cut each one on your 12x12 mat or both using a 12x24 mat. Download

Mini Single Use Packet How To

Image
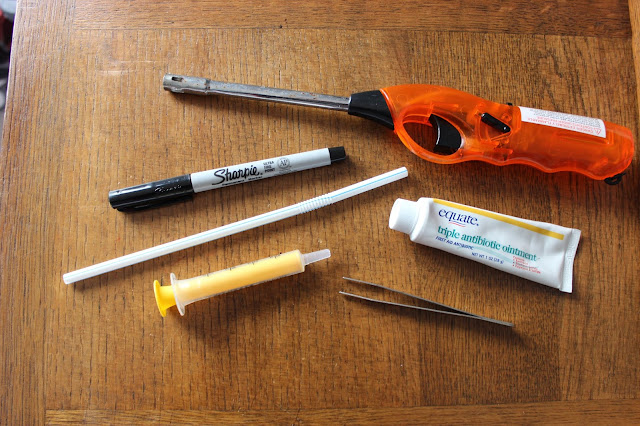
Perfect for little First Aid Kits, these little guys are super easy to make!  In fact, I had enough store-bought packets of antibiotic ointment for each of the girls in my Girl Scout Troop, and I still chose to make these just because! Supplies needed include: Plastic straw (you can get about 7 small tubes out of 1 straw) Scissors Tube of antibiotic ointment Lighter Tweezers or Needle nose pliers Ultra Fine Tip Sharpie Syringe with narrow tip First, I cut the straw into pieces approximately 3cm long.  I did not use the flexible part of the straw. Then holding one end of the cut piece with the tweezers or pliers, heat it with the lighter until the end fuses.  (I allowed the plastic to cool a bit before setting it down so it didn't separate.) I then filled the (clean) syringe part way by inserting it tightly into the tube of antibiotic ointment.  I gently squeezed the ointment tube and pulled the plunger back at the same time. I then i

How to Adjust a Name/Image Doily to Avoid Skewing

Image
On occasion, I will add a picture to a doily, especially when I'm making a doily for a child.  So far, I hadn't run into an image that was skewed in a way that it just simply didn't look right.  Plus, this was a good opportunity to see how to make a smaller doily without changing my hook or thread size. Below is a picture of the finished product. This what it looked like after I made the adjustment and finished the doily, adding a simple border. Here is the original doily next to the adjusted one.  You can see how the original one was much longer top to bottom and the rose image was "stretched"/skewed.  (Some of you may also note a slight hue difference between the left and right sides of the lavender doily.  This is not a photo alteration.  I switched thread balls and that is just how different the two batches must have been!) Here is the original pattern drawing.  You can see how the rose has a nice even height/width proportion and this

Crochet Name Doily - Part 3 - Starting Your Doily

Image
Here's where we start our actual doily!! Things you will need: 1) Size 10 thread in desired color 2) Size 7 (1.65mm) steel crochet hook 3) Pattern for desired name Below, I have an image of my pattern for my doily. Notice the bold lines to help delineate the border. Get your thread and hook ready!  Time to start your doily! Keep your eyes peeled for Part 4 - Adding a Border

Crochet Name Doily - Part 2 - Creating a Name Doily Chart

Image
Welcome back!! Here is Part 2 of our Name Doily Tutorial! Things you will need: 1) Grid Paper (you can find free printable versions online or buy a pad of it at the store) 2) Pencil (Trust me, you don't want to use pen.  You could make errors in charting or even decide to go back to adjust the letter pattern after your finished charting.) 3) Font Pattern (You can find these online, on Pinterest, or make up your own!  I choose to find them online/Pinterest.)  Fancy fonts are more difficult, so keep that in mind when looking. Here is a sample font that I used for a doily recently. For simplicity sake, I will use the pictured font above in the video tutorial.  Have your pencil and paper ready! As recommended in the video, draw out the  entire name before starting work on your doily. Here is what it looked like when I used the Excel sheet to chart the letter. Note that I still added a bold line two rows above and two rows below my letter to referen

Crochet Name Doilies - Part 1 - Mastering the Techniques

Image
Ok folks, here is my first attempt at a crocheting tutorial, so bear with me. Since I recently did several name doilies for Christmas and had a request from a friend to teach her how to do this.  "Absolutely!" was my response. 😉 I have posted the video below. Part 1 is for the BEGINNER, reviewing how to chain and double crochet and the basics of creating the foundation of a name doily. We will use an H/5.00mm hook and worsted weight yarn for practice. Watch Part 1A & Part 1B Below is a diagram of what the structure should look like. Below is the drawn pattern for the practice project. I have added the border rows on this chart to make it easier for beginners to see the spacing on your practice project.  These border rows may not be on other patterns found online. Here is the image of my finished product. As promised, this is the link to the site that I learned from when I first started doing name doilies! http://w